I started the Thiosphere design in Plasticity.
Plasticity is a relatively new CAD tool that sits in an interesting space: more capable than SketchUp, more accessible than SolidWorks, optimized for artists and designers rather than engineers.
This post explains why I chose it, what it did well, and why I eventually migrated to OnShape.
The CAD Landscape
When starting any physical design project, you face the CAD tool question. The options:
SketchUp: Easy to learn, free tier available, widely used for architectural visualization. Weak on precision, poor for complex geometry, minimal manufacturing output.
Fusion 360: Full-featured parametric CAD, free for hobbyists, good community. Autodesk's cloud dependency and changing terms create uncertainty. Interface is capable but cluttered.
SolidWorks: Industry standard for mechanical engineering. Expensive ($4,000+ annual), requires Windows, steep learning curve. Overkill for DIY projects.
OnShape: Cloud-native parametric CAD, free for public documents. Browser-based (no install), collaborative features. Less artistic flexibility than some alternatives.
Plasticity: SubD (subdivision surface) modeling with NURBS output. Excellent for organic shapes. Fast, intuitive, relatively affordable ($149 perpetual license at the time).
Why Plasticity First
I chose Plasticity for the concept phase for specific reasons:
Speed of Exploration
Plasticity's SubD workflow is fast. You push and pull surfaces directly. Changes happen in real-time. There's no feature tree to manage, no constraints to satisfy.
For early exploration — "what if the dome were taller? what if we removed this section?" — this speed matters more than precision. I could test twenty variations in a day.
Organic Shape Support
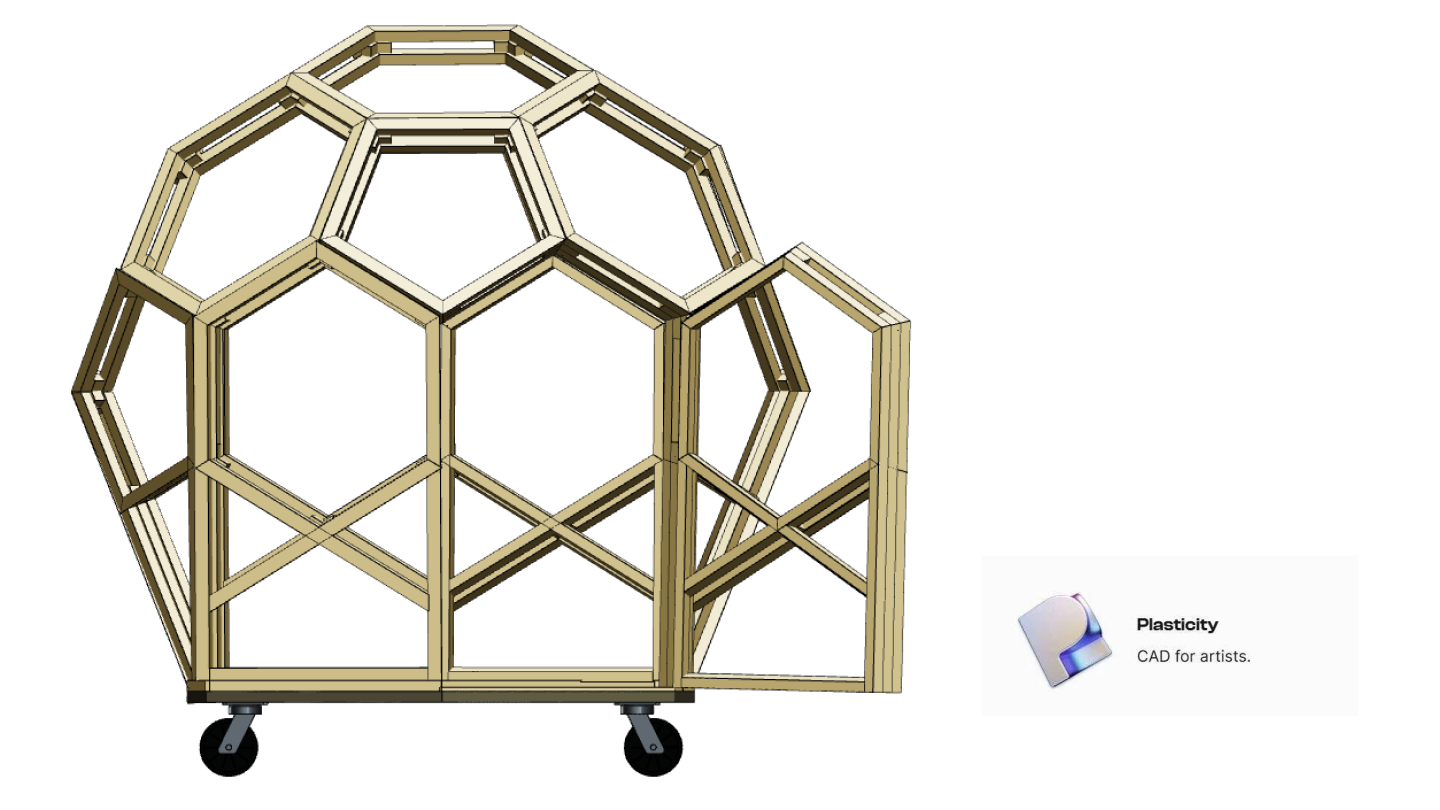
The Thiosphere isn't quite a sphere — it's a polyhedral approximation. The surfaces aren't perfectly flat; they have subtle curves that improve structural properties and aesthetics.
Plasticity handles these curves naturally. You start with a shape, subdivide it, smooth it, and the result just looks right. Traditional CAD tools fight against organic forms.
Visual Quality
I needed renders and visualizations to communicate the concept — to myself, to potential collaborators, to this blog.
Plasticity's viewport quality is excellent. Even without dedicated rendering, the models look presentable. This saved time during the "convince myself this idea is worth pursuing" phase.
Learning Curve
I'm not a professional CAD operator. I needed a tool I could become productive with quickly.
Plasticity's interface is minimal. There aren't menus nested five levels deep. Most operations are accessible through direct manipulation or simple shortcuts. Within a week, I was productive.
What Plasticity Did Well
Proving the Geometry
The first critical question: would the polyhedral-sphere geometry work?
In Plasticity, I could:
- Start with a sphere
- Subdivide it into triangular/pentagonal faces
- Flatten each face (approximating flat panels)
- Check that the result still looked reasonably spherical
This took maybe two hours. The geometry worked. The concept was viable.
Exploring Variations
How many faces? What proportions? Where should the door go? What angle for the platform?
Each question required iterations. Plasticity's non-destructive workflow meant I could:
- Save a version
- Make changes
- Compare results
- Revert if the change didn't work
By the end of exploration, I had dozens of saved variations representing different tradeoffs.
Creating Visualizations
The blog posts, the pitch materials, the internal "should I really do this?" documents — all needed visuals.
Plasticity exported clean images that communicated the idea effectively. The spherical geometry, the double-shell section cut, the assembled components — all rendered beautifully.
Understanding the Design
Something happens when you manipulate a 3D model with your hands (well, mouse). The design becomes real in a way that 2D drawings don't achieve.
Spending hours in Plasticity, rotating the model, cutting sections, adding components — I internalized the design. When problems emerged in physical prototyping, I could often visualize the solution because I'd already "held" the model in my mind.
Where Plasticity Hit Limits
Lack of Parametric Control
Plasticity doesn't do parametric modeling. If you want to change the wall thickness from 3.5" to 5.5", you have to manually adjust every affected surface.
For exploration, this is fine. For production documentation — where a change needs to propagate correctly through the entire design — it's a nightmare.
The first time I tried to generate cut lists from Plasticity, I realized the problem. Change one dimension, and you have to manually update dozens of related dimensions. Miss one, and the design is internally inconsistent.
No Assembly Modeling
Real structures have parts that fit together. Bolts go through holes. Panels meet at seams. Clearances must be maintained.
Plasticity has no assembly modeling. You can import multiple objects, but they don't "know" about each other. There's no way to say "this hole is always centered on that face" and have the relationship maintained.
For a multi-part structure, this means you can't verify fit. You're trusting that your manual coordination is correct. It often isn't.
No Manufacturing Outputs
Builders need cut lists, dimensions, and drawings. Plasticity doesn't generate these.
You can export geometry and dimension it in another tool, but the workflow is fragmented. Changes in Plasticity don't automatically update the downstream documents.
File Format Limitations
Plasticity saves in its own format. Export options exist (STEP, OBJ, etc.), but round-tripping is lossy. Once you export, you can't bring changes back into Plasticity cleanly.
This matters for collaboration. If someone wants to modify the design, they need Plasticity. If they modify in another tool, the changes can't be merged back.
The Migration to OnShape
When it came time to produce actual documentation — cut lists, assembly instructions, dimensional drawings — Plasticity couldn't deliver.
I rebuilt the design in OnShape. Not imported — rebuilt. The parametric relationships, the assembly constraints, the production metadata — all had to be created fresh.
This took about three weeks. It was tedious. It was also necessary.
The OnShape version is:
- Fully parametric (change a dimension, everything updates)
- Properly assembled (parts fit together with defined relationships)
- Manufacturing-ready (cut lists, BOMs, and drawings generate automatically)
- Collaborative (public documents that anyone can view, copy, and modify)
The design didn't change much. The documentation capability changed completely.
Lessons for Tool Selection
This experience taught me about matching tools to phases:
Exploration Phase
Prioritize:
- Speed of iteration
- Visual quality for communication
- Low learning curve
Deprioritize:
- Precision
- Manufacturing outputs
- Collaboration features
Plasticity, SketchUp, even paper sketches work well here.
Production Phase
Prioritize:
- Parametric control
- Manufacturing outputs
- Collaboration and version control
Deprioritize:
- Speed (accuracy matters more)
- Visual aesthetics (documentation matters more)
OnShape, Fusion 360, SolidWorks work well here.
The Transition
Don't try to skip phases or use one tool for everything.
Exploration tools make production painful. Production tools make exploration slow.
Budget time and effort for the transition. Rebuilding is part of the process.
Current State
Today, all production work happens in OnShape. The files are public, parametric, and collaborative.
But I still use Plasticity occasionally — for quick visualization tests, for exploring major variations before committing to OnShape rebuilds, for creating marketing images.
Different tools for different jobs. Use the right tool.
See our current CAD files — production-ready OnShape documents.
Learn more about our CAD migration — why we made the switch.
Get the handbook — the output of all this CAD work.