The drawings looked good. The CAD model rotated beautifully on screen. The calculations said it would work.
But until you build something, you don't know if it actually works.
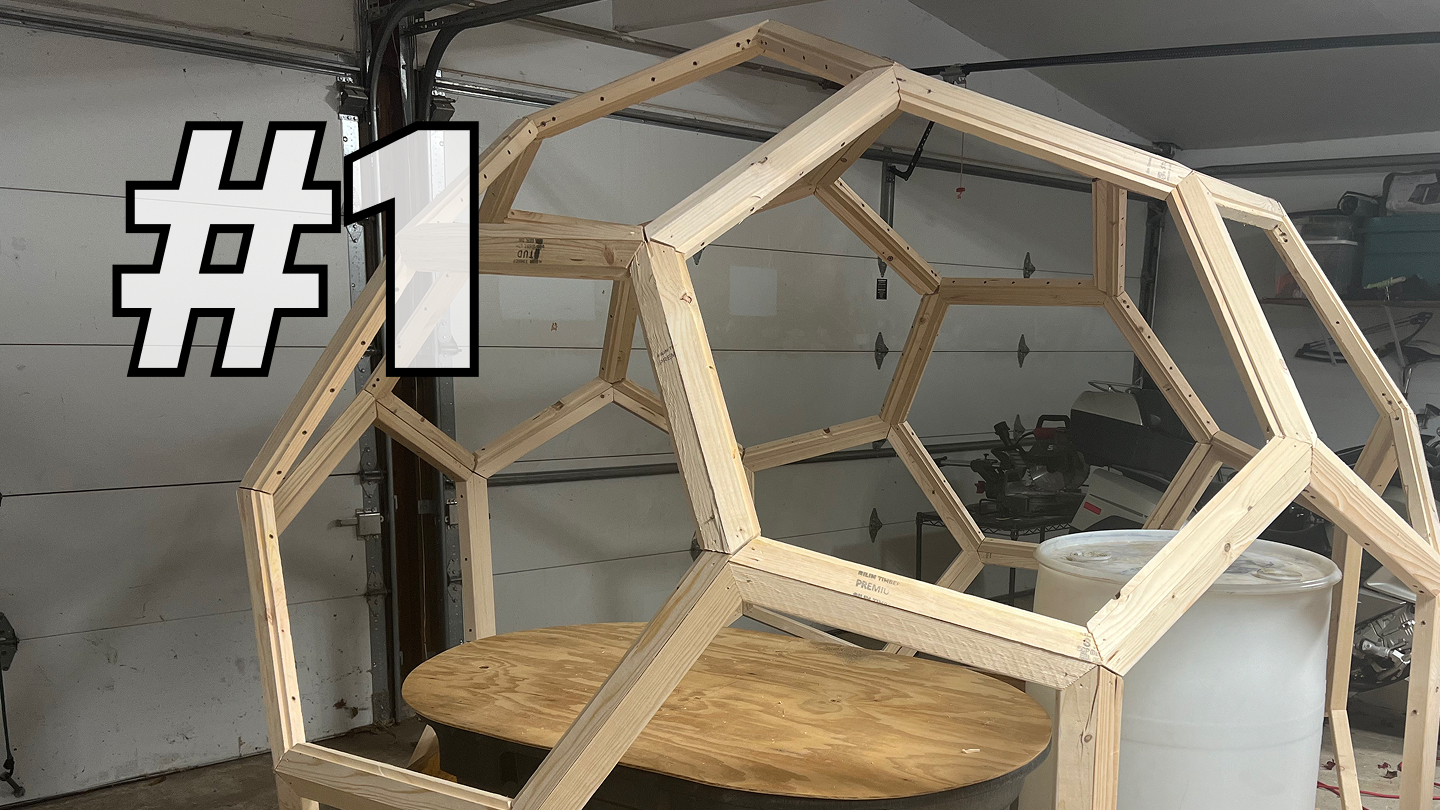
This is the story of Proto 1: the first Saunosphere, built in my backyard over five days in September 2024.
Why Start With a Sauna?
I had several options for the first prototype:
- Agrosphere (growing space) — my original motivation
- Ergosphere (office/workspace)
- Saunosphere (sauna)
- Generic Thiosphere (unspecified use)
I chose sauna for strategic reasons:
Forgiving Requirements
A sauna needs to get hot and stay hot. That's the core requirement. If the walls have small gaps, if the insulation isn't perfect, if the door doesn't seal completely — it still works. You just burn a bit more wood.
Compare to a growing space: if the temperature fluctuates too much, plants die. If light levels are wrong, plants struggle. The requirements are precise.
For a first prototype with unknown failure modes, forgiving requirements matter.
Clear Success Criteria
"Did the sauna get hot?" is a yes/no question. I can answer it in one evening of testing.
"Did the growing space produce healthy plants?" takes months to answer. And if it fails, was it the structure or my gardening skills?
Clear, fast feedback accelerates learning.
Personal Motivation
I wanted a sauna. Not for the project — for myself. I'd been going to a commercial sauna twice a week, paying $15 per session. A backyard sauna would pay for itself in a year.
When you're building something you personally want, motivation sustains through the frustrating parts.
The Build: Day by Day
Day 1: Platform
The platform is the foundation — literally. Get it wrong and everything else suffers.
I set up 4x4 posts on adjustable post bases, leveled to within 1/8" over the 10-foot span. This took longer than expected. The ground wasn't as flat as it looked, and achieving true level required repeated adjustment.
On top of the posts: doubled 2x8 beams, then 2x6 joists at 16" on center. Standard deck framing, nothing exotic.
The platform floor: 3/4" CDX plywood, with planned replacement by cedar decking later. For prototyping, plywood is fine.
Day 1 lesson: Platform leveling takes longer than you think. Budget extra time or your schedule slips.
Day 2: Outer Shell Frame
The Thiosphere design uses a polyhedral approximation of a sphere — flat panels arranged to create a roughly spherical shape. The outer shell is the weather-facing layer.
I pre-cut all the frame members (2x4s at various angles) based on the cut list. The cuts themselves were simple — all straight, using a miter saw. The complexity is in the assembly: each joint needs the right angle, and errors compound.
We (my neighbor helped) assembled the bottom ring first, then built upward. Each ring sits on the one below, connected with structural screws. The shape emerged gradually — first a polygon, then a bowl, then something dome-like.
Day 2 lesson: Having a helper is essential for the shell assembly. You can't hold a frame member in position and screw it at the same time. Two people makes it 3x faster, not 2x.
Day 3: Outer Shell Sheathing
With the frame up, we added the outer sheathing: 7/16" OSB panels, cut to match the panel templates.
This is where the flat-pack design showed its value. Each panel was cut from a standard 4x8 sheet. The cuts were straight lines. A circular saw and a straightedge were the only tools needed.
The panels screwed to the frame with construction screws. No special fasteners, no complex joinery. If I made a mistake cutting, I cut a new panel from the scrap pile.
By end of day 3, the outer shell was closed. It looked like... something. Not quite a dome, not quite a geodesic, but clearly spherical-ish.
Day 3 lesson: Pre-cutting panels speeds assembly dramatically. We had all panels labeled and stacked in order. Grab, position, screw, grab the next one.
Day 4: Insulation and Inner Shell
The gap between outer and inner shells is where the thermal magic happens. We filled this gap with mineral wool batts — R-15 in the walls, R-30 in the ceiling area where heat accumulates.
On the warm side of the insulation: aluminum-faced kraft paper as a vapor barrier. This reflects radiant heat back into the sauna and prevents moisture from reaching the insulation.
Then the inner shell frame (lighter 2x3 members) and inner sheathing. For the sauna, we used untreated softwood planks — tongue-and-groove pine. No finish, no treatment — heat and moisture will season the wood naturally.
Day 4 lesson: Insulation is unpleasant work. Wear long sleeves, gloves, and a dust mask. Budget your patience.
Day 5: Stove, Benches, and First Fire
Day 5 was the exciting day.
We installed the wood stove — a Harvia M3, designed for small saunas. The stove sits on a cement board base with proper clearances from combustible surfaces. The stovepipe exits through a dedicated penetration in the shell, with high-temperature insulation around the pipe.
Then the benches: two levels, the upper bench at about head height when sitting on the lower bench. Cedar planks for these — the one place I splurged on materials.
And finally: the first fire.
We loaded the stove with kindling and small logs. Within 20 minutes, the interior was warm. Within 45 minutes, it was properly hot — 80°C on the thermometer mounted at bench level.
The löyly test: throw water on the rocks, feel the steam wave. It worked. The rocks were hot enough to vaporize water instantly.
Day 5 lesson: First fire is emotional. Months of planning, a week of building, and then it works. Take photos. Celebrate.
What Worked
The Basic Design
The nested-shell approach worked exactly as intended. The outer shell handles weather; the inner shell defines the living space; the air gap between them provides insulation and drainage.
Heat retention was excellent. After the stove burned down, the sauna held temperature for over an hour — long enough for multiple sessions without refueling.
The Construction Approach
Every cut was straight. Every joint was simple. The tools required were basic: circular saw, drill, tape measure, square.
A competent DIYer could replicate this build. It doesn't require professional carpentry skills or specialized equipment.
The Materials
Standard lumber and plywood. Nothing exotic, nothing special-ordered. Everything came from Home Depot in two trips.
The material cost came to approximately $3,200 — well under my $5,000 target. The stove was the biggest single expense at $800.
What Needed Improvement
Door Seal
The door is a weak point in any sauna. Heat escapes around the edges. The first door I built leaked too much — the seal was inadequate.
Solution for Proto 2: better weather stripping and a magnetic closure system. This is now documented in the handbook.
Ventilation Tuning
Saunas need fresh air, but too much ventilation wastes heat. The intake and exhaust vents I installed were oversized. In practice, I had to partially block them during use.
Solution: adjustable vent covers, documented in the updated plans.
Roof Drainage
The dome shape naturally sheds water, but the transition at the roofline pooled water during heavy rain. Not a leak, but a potential problem over time.
Solution: add a small drip edge at the transition. Simple fix, now included in the design.
The User Response
I invited neighbors and friends to try the sauna. The response was consistently positive:
"It gets hot fast."
"The steam feels right."
"I can't believe you built this."
The last comment is the most meaningful. People assume saunas require professional installation. Showing them that a DIYer can build one in a week changes their mental model of what's possible.
Several people asked for plans. That's what started this project toward publication.
Cost Breakdown
| Category | Cost |
|----------|------|
| Lumber (framing) | $680 |
| Plywood/OSB | $450 |
| Insulation | $320 |
| Interior finish (cedar) | $480 |
| Stove and stovepipe | $850 |
| Hardware (screws, brackets) | $190 |
| Vapor barrier, tape, sealant | $120 |
| Miscellaneous | $110 |
| Total | $3,200 |
This doesn't include tools (I already owned what was needed) or my time. With lumber prices fluctuating, your cost may vary by 20-30%.
What I Learned
Prototypes Are Teachers
The CAD model showed what should work. The prototype showed what actually works. These are different things.
I found problems I couldn't have anticipated: the door seal, the vent sizing, the drainage detail. Each problem taught something that improved the next iteration.
Simple Beats Clever
The temptation with any design project is to be clever — to optimize, to innovate, to add features. Mostly, this backfires.
The successful parts of Proto 1 were the simple parts: straight cuts, standard lumber, conventional joinery. The problematic parts were where I tried to be clever.
Build Time Is Real
I estimated the build at 3-4 days. It took 5 days, with a helper. Estimates are always optimistic.
The handbook now includes realistic time estimates based on actual builds, not theoretical planning.
What's Next
Proto 1 proved the concept. The nested-shell design works. The construction approach is DIY-accessible. The cost is reasonable.
Proto 2 will test a different use case: the Immosphere, an entertainment and gaming pod. Same basic platform, completely different interior configuration.
On to Proto 2.
Explore the Saunosphere — the sauna that started it all.
Get the handbook — complete plans incorporating Proto 1 lessons.
Join the community — share your build and learn from others.